CMS-OpenData-Pipeline Wiki
Overview
CMS Open Data has immense potential for the researchers outside the collaboration. They can exploit the scientific potential of these data and also test out novel ideas with an actual detector setup. CMS Open Data includes collision as well as their simulated datasets, which allows researchers to perform different analyses and even search for new physics. The collaboration can also test out novel ideas and improve the current methods of particle detection and reconstruction.
Majority of primary datasets of CMS Open Data are in the AOD or miniAOD format. AOD has an unique data structure which stores a lot of information from proton-proton collisions, some of which might not be required for a specific physics analyses. miniAOD has a simpler structure than AOD but still contains a lot of high-level information. This makes it difficult for someone outside the collaboration to work with the AOD or the miniAOD sturcture and perform analyses. AODs retain a large amount of low level information necessary for development of algorithms. Typically in analysis level nanoAODs are preferred.
Our pipeline aims to deliver a much simpler format, the FunAOD, which is similar to nanoAOD in structure, a flat Ntuple, but has even lesser information due to it's focus on optimizing size and analysis speed. It only contains the necessary observables for higher level physics objects. But if one wishes, they can add more information by modifying the EDAnalyzer. As the name suggests, our aim is to make particle physics fun.
Pipeline Design
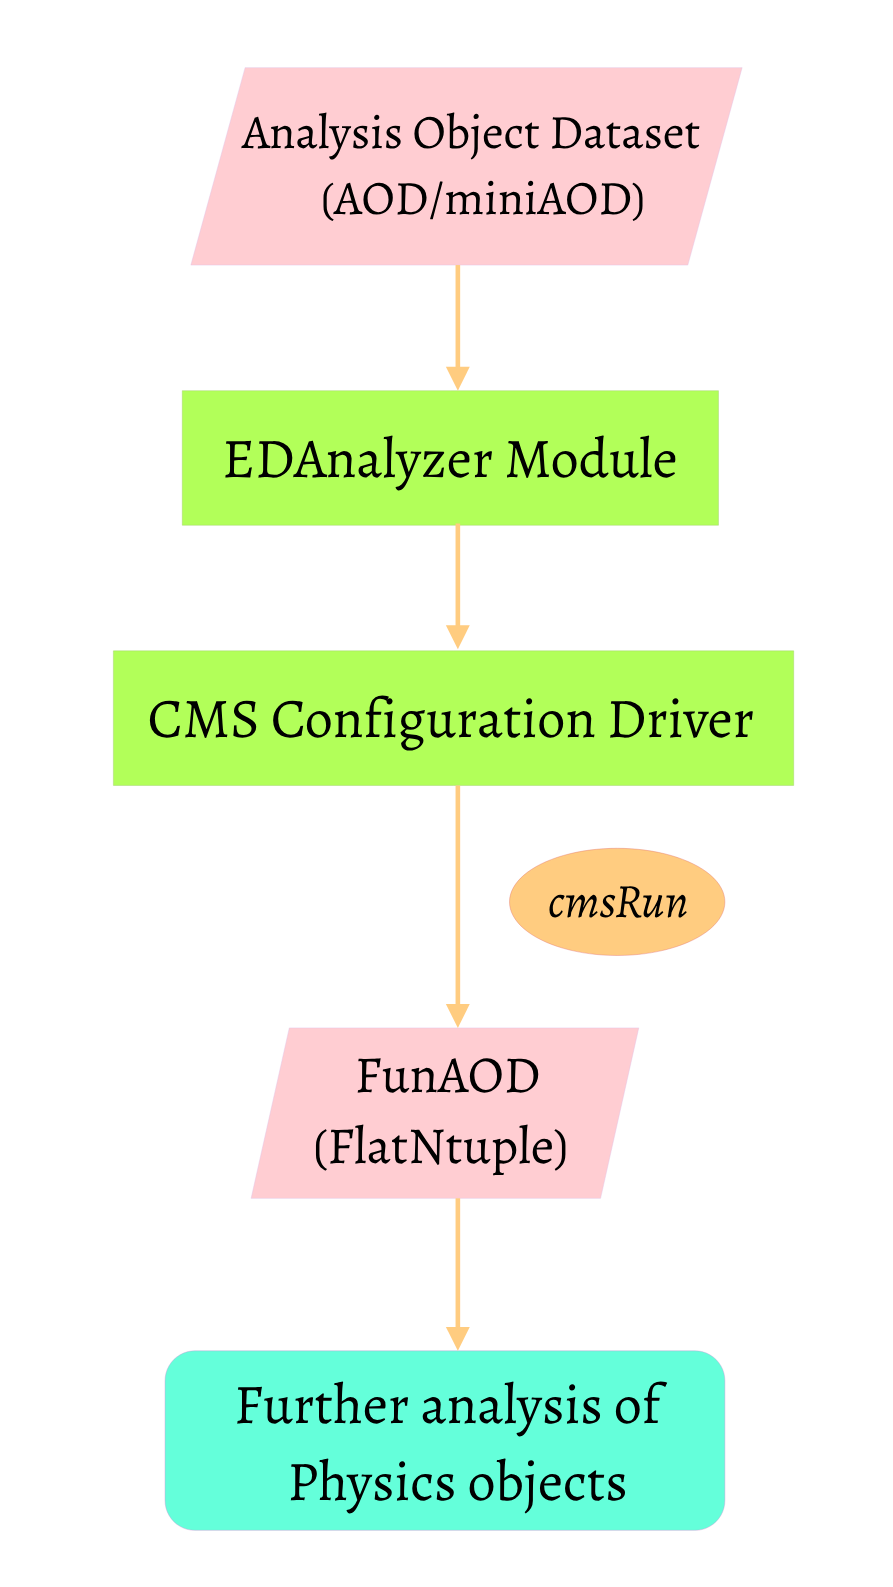
- The pipeline consists of a AOD for Run 1 and miniAOD for Run 2 as an input file.
- An EDAnalyzer module is written to write out all the necessary information required for the physics analysis to a flat Ntuple file called FunAOD that can be used for further physics analysis.
- A CMS configuration file loads all the required modules necessary for producing the FunAOD.
EDAnalyzer: AOD2FunAOD
To extract information from the AOD data format, a module called EDAnalyzer is written that allow read-only acecss to the Event. It is written in C++. The following information is then writes the following information to the FunAOD:
- Particle Flow Candidates
- Reconstructed Jets
- Reconstructed Muons
- Reconstructed Electrons
- Reconstructed Photons
- Generator-Level Particles (only AODSIM)
- Generator-Level Jets (only AODSIM)
EDAnalyzer: miniAOD2FunAOD
To extract information from the AOD data format, a module called EDAnalyzer is written that allow read-only acecss to the Event. It is written in C++. The following information is then writes the following information to the FunAOD:
- Reconstructed Jets
- Reconstructed Muons
- Reconstructed Electrons
- Reconstructed Photons
- Generator-Level Particles (only miniAODSIM)
- Generator-Level Jets (only miniAODSIM)
CMS configuration files
The CMS configuration files define the EDAnalyzer modules to be loaded, the configurable parameters and the order the events will run. The configuration files are written in Python. In this particular pipeline the CMS Configuration file defines the following:
- Input AOD/AODSIM or miniAOD/miniAODSIM file to be accessed in the CMS open database.
- Detector alignment and caliberation (AlCa) modules.
- Number of events to analyze.
- Whether it is a collision or simulated dataset.
- The center of mass energy of collision (7 TeV or 8 TeV - only for AOD2FunAOD).
- Output FunAOD file.
The configuration files are executed using cmsRun, a CMSSW executable that loads all the required modules during runtime.
The flat Ntuple: FunAOD
The output file produced by the pipeline is a flat Ntuple called FunAOD which is a ROOT flat tree. A flat tree is a structure that can be read by standalone ROOT, without requiring any additional libraries. This particular flat tree stores event level information of reconstructed as well as generator level particles. This FunAOD can be directly used for analysis of physics objects. This particular flat tree contains leaves which stores all the properties of the particles extracted from AOD or miniAOD. The FunAOD has a structure similar to the nanoAOD format, but is much simpler in structure. The average size of the FunAOD is 0.5 - 1.5 GB (depending upon the number of events).
Getting Started
Before you start using the CMS-OpenData-Pipeline to make FunAODs:
- Take a look at the requirements
- Also take a look at the example plotting $\mu^{+}\mu^{-}$ invariant mass.
Setup and Installation
Requirements for the pipeline
The CMS-OpenData-Pipeline has certain requirements:
- Docker should be up and running in the local machine. Alternatively, CMS-OpenData Virtual Machine works as well. (It is recommended not to use the VM as it is painfully slow)
- CMS Offline Software Framework - CMSSW should be set up in the docker container.
- MiniConda or AnaConda should be installed in your local system.
- ROOT(6.20 or higher) must be installed in the local machine.
- Linux-based systems are preferred, Windows systems are not recommended as docker has compatibility issues with Windows.
Docker is a container tool that provides the user with a snapshot of a specific CMSSW version to work on your local machine without the requirement for lxplus or a CERN account. For Run 1, the docker container containing the CMSSW_5_3_32 needs to be installed and for Run 2, the docker container containing the CMSSW_7_6_7 needs to be installed.
Setting up the Docker container: CMSSW_5_3_32
The CMSSW_5_3_32 container image is available on DockerHub. The installation process for the software environment is discussed below:
- Fetch the docker container on the local machine using:
- Now let's mount a common file area for sharing files between the docker container and the local machine:
- Then to run the docker container using the following command:
- The name given to the container is
CMSSW_5_3_32. After the fetching is done one shall be able to access the CMS offline software environment from here. - To start the Docker container again:
docker pull cmsopendata/cmssw_5_3_32-slc6_amd64_gcc472export workpath=$PWDmkdir cmsopendatachmod -R 777cmsopendata
docker run -it --name CMSSW_5_3_32 -P -p 5902:5902 -p 6080:6080 -v $workpath/cmsopendata:/code cmsopendata/cmssw_5_3_32-slc6_amd64_gcc472:latest /bin/bash
Note: Once one uses the exit command or closes the terminal mistakenly (which we all do a lot of times), the Docker container needs to be started again.
docker start -i CMSSW_5_3_32Note: To start the docker container, one is compelled to type this command in their terminal over and over again. So, it is better if one makes a terminal shortcut command or an alias in the.bashrc(or your shell's read-command file) file. Locate the.bashrcfile in the/home/directory and add the following lines to the file:
alias c532="docker start -i CMSSW_5_3_32"c532 to start the docker container.
Setting up the Docker container: CMSSW_7_6_7
The CMSSW_7_6_7 container image is available on DockerHub. The installation process for the software environment is discussed below:
- Fetch the docker container on the local machine using:
- Now let's mount a common file area for sharing files between the docker container and the local machine:
- Then to run the docker container using the following command:
- The name given to the container is
CMSSW_7_6_7. After the fetching is done one shall be able to access the CMS offline software environment from here. - To start the Docker container again:
docker pull cmsopendata/cmssw_7_6_7-slc6_amd64_gcc493export workpath=$PWDmkdir cmsopendatachmod -R 777cmsopendata
docker run -it --name CMSSW_7_6_7 -P -p 5901:5901 -p 6081:6081 -v $workpath/cmsopendata:/code cmsopendata/cmssw_7_6_7-slc6_amd64_gcc493:latest /bin/bash
Note: Once one uses the exit command or closes the terminal mistakenly (which we all do a lot of times), the Docker container needs to be started again.
docker start -i CMSSW_7_6_7Note: To start the docker container, one is compelled to type this command in their terminal over and over again. So, it is better if one makes a terminal shortcut command or an alias in the.bashrc(or your shell's read-command file) file. Locate the.bashrcfile in the/home/directory and add the following lines to the file:
alias c767="docker start -i CMSSW_7_6_7"c767 to start the docker container.
Usage and Application
The CMS-OpenData-Pipeline is developed by the Experimental High Energy Physics group at IISER-Pune. The pipeline is capable of making custom Ntuples called FunAODs consisting of high-level physics objects (for e.g: electrons, muons, jets) from Run 1 AODs and Run 2 miniAODs.
Setting up and the pipeline in the Docker container
To set up the CMS-OpenData-Pipeline in the docker container, clone the GitHub repository onto the Docker container. The repository should be cloned into the /code/CMSSW_5_3_32/src/ directory in the Docker container. The following command shall clone the repository:
git clone https://github.com/xondikoi03/CMS-OpenData-Pipeline.gitMaking a FunAOD
Let us see how can we make a simple FunAOD:
- Navigate to the CMS-OpenData-Pipeline’s AOD2FunAOD directory. The directory path is given as:
/code/CMSSW_5_3_32/src/CMS-OpenData-Pipeline/AOD2FunAOD/Test. -
In this directory you’ll find a python file named testntuple.py, which we will be using for our test problem. There shall also be a C++ source file named
testntuplemaker.ccthat will be used by the python file in the../src/ directory. You can access these files and make changes later. - Now, let us produce a FunAOD that will contain high-level muons. For that we’ll have to compile the source code before we can exeute it. To compile the files, one has to run the following command:
- After successful compilation, the FunAOD can be made using the following command:
scram b -j 8cmsRun testntuple.py nEvents=5000 isData=Falsetestoutput.root. This file can be accessed through TBrowser in ROOT.
Note: To run over all events, set nEvents=-1
Congratulations, we’ve now successfully created the first FunAOD containing muon information of 5000 events from a DYJetsToLL simulated sample. Now, let’s take this FunAOD out of the docker container to the local machine. (ROOT doesn’t really work in the docker container, so it’s better to have in the local machine).
Example - Plotting the $\mu^{+}\mu^{-}$ invariant mass
Now that we have created a FunAOD, let us make a dummy analysis using analysis files that can be found in the AnalysisCodes directory. A directory named test_dimuon_mass shall contain the a dummy analysis file. To run those files using ROOT in your local machine, do the following:
- Change directory to
test_dimuon_mass. - Initialise the ROOT terminal using:
- Compile the code from the ROOT terminal:
- Execute the driver file using:
- You can plot the $\mu^{-}\mu^{+}$ invariant mass by running the plotting script:
- You shall get a plot like shown below once you run the script.
cd AnalysisCodes/test_dimuon_mass/root --web=off.L cmsAna.C+.x driver.C.x graphing.C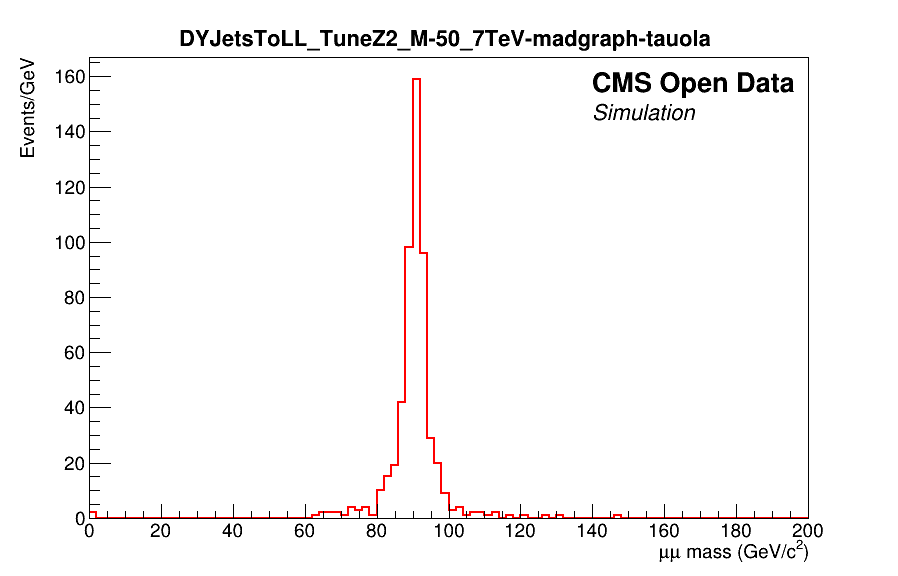
That’s it, we’ve now plotted the $\mu^{+}\mu^{-}$ mass using the CMS-OpenData-Pipeline. Fun, isn’t it? One can thus do even more complex analyses using the CMS-OpenData-Pipeline.
Note: A more detailed manual for Run 1 AOD2FunAOD is available.